
How to configure multiple images as per variants in shopify
This article will show you how to add multiple variant images to product pages in the Shopify theme. The code may need to be required some adjusted to suit the theme you are working on.
To get started, I have loaded my variant images but now I want to associate additional images with each variant. I only want to display the associated images as thumbnails when the variant option is changed on my product pages.
For example: I only want the yellow chair image, and the yellow pillow image to show as thumbnails when “Option 2” is selected.
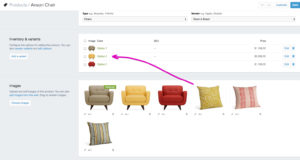
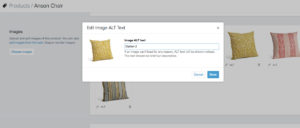
I will be using alt tags to associate the additional images (alt tags don’t need to be applied to the feature images).
Apply the matching variant option title to each of the additional images:
We will begin our changes in the product.liquid file. Find the code for the image thumbnails, it should look like this:
{% for image in product.images %}
Above this line add:
{% assign featured_alt = product.selected_or_first_available_variant.option1 %}
Just after the for loop add an if statement (featured image should have already been defined above):
{% if image.alt == featured_alt or image == featured_image %}
We then need to add the script from the first file in this gist (the second file is the thumbnail code from the above screenshot). Add the code to to the bottom of the product.liquid template.
This is an example of what the switchImage function from the gist could look like:
  var switchImage = function(newImageSrc, newImage, mainImageDomEl) {

  jQuery(mainImageDomEl).attr('src', newImageSrc);

  $(mainImageDomEl).parents('a').attr('href', newImageSrc);

};
All done now.just enjoy it.